This post contains affiliate links from which we receive a commission on qualifying sales.
There’s loads of arm knitting tutorial out there, but no one seems to be teaching how to do cables with arm knitting so I thought I’d spill the beans. Let’s make an arm knitted WAVE blanket!
Arm knitting is always fun because you can get a whole project done in one afternoon or even one sitting if you’re really fast or choosing something smaller.
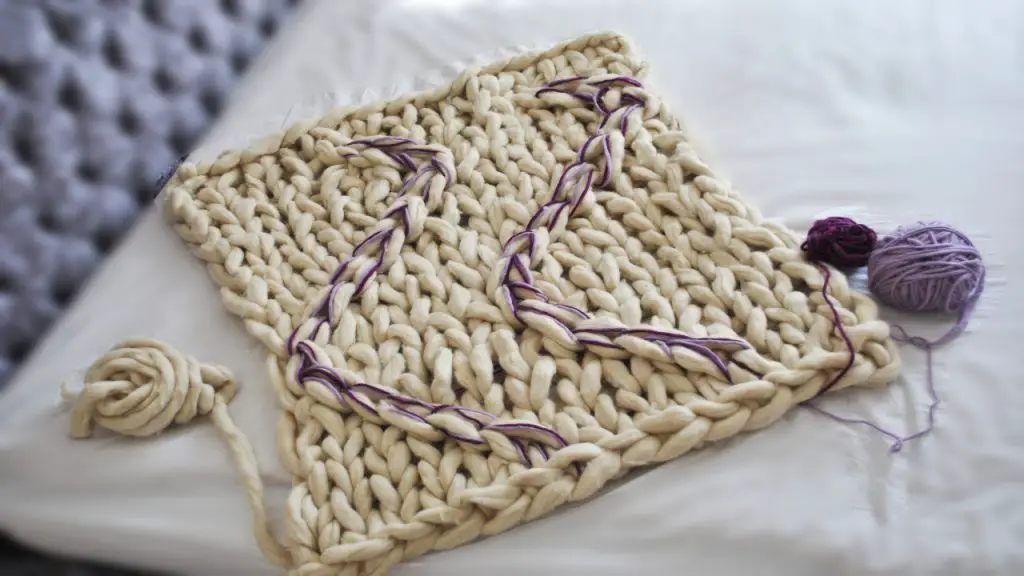
For this project I used 2 kgs (4 lbs) of pure wool roving which I lightly felted first (so it doesn’t shed like mad everywhere), and also a colored pencil roving yarn or any other pretty yarn synthetic or anything else for that matter.
Time to watch the video or continue reading for written instructions. I hope this arm knitting tutorial helped you. Let me know in the comments what would make it easier for you to learn. I’m always looking for ways to improve.
P.S. Although the video says more than 3 hours it’s actually about a 30 min project, the length is only because it was on a loop as I LIVE streamed it.
The Cast On
For the cast on you’ll need to find the tail of your felted roving, make a slip knot and do a crochet cast on. To do that you need to put your hand through the loop grab the yarn that’s coming off your main ball of yarn and pull it through the loop. This will create another loop. Continue doing the same thing over and over until the chain you’ve just created is as long as you want your blankets width to be.
The Body Of The Blanket
For the body you’ll need to do one row of knit stitches. Then add the colored yarn and do the cabling. Two stitches will need to have the colored yarn laying over the top of the roving, and you’ll actually need to have two SEPARATE strands of yarn for each separate wave.
I had 2 strands of yarn on each of my “Waves” to give it an extra pop of color, BUT mine were connected at the back which makes a very messy looking back. If your yarn is separate you won’t even be able to see it on the back of the blanket because all the colors will be in the front.
Be sure to watch the video on how to arm knit the project up.
Take Action!
Be sure to share this info with your friends. There are unfortunately loads of arm knitters knitting up wool roving without knowing it needs to be lightly felted first. The result…. disastrous. Blankets pilling, fuzzing and shedding everywhere and I’ve even heard horror stories of parts of blankets tearing apart!
Help spread the word by sharing your knowledge.
Happy Arm Knitting,
Stacy
