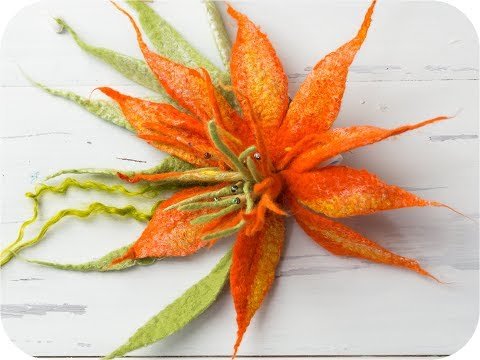
Wet Felting a Spiky Flower Tutorial
Watch the video!
Need some flower inspirations? You can check out some custom flower pots to display your gorgeous bouquets.
What you’ll need:
- Various Colours of Wool Roving (this exact kit here)
- Bubble Wrap
- Warm slightly soapy water
- A spray bottle or something to drizzle the warm water over your project
- Scissors
- Little beads (optional)
Time to complete the project:
30 to 40 minutes (with a sander, without a sander it will take longer)
When wet felting it’s always important to bear in mind that felting wool takes time, so don’t rush it. Plan to spend a good 30 to 40 minutes completing this project.
Step 1. Laying out your wet felting design
Lay out strips of your wool roving in the pattern you’d like on the bubble wrap with the main colour.
Add accent colours of wool roving onto the top of your base colour, when you wet felt this together later the colours will beautifully compliment each other.
Step 2. The first wet felting process
Now that everything is nicely laid in order you need lightly spray it with the warm soapy water and cover it with another piece of bubble wrap.
If you have an electric sander this is the time to use it, but if not you can run your fingers over the bubble wrap back and forth until all the wool underneath gets a bit wet and soapy and starts to stick together.
Continue working until your piece is quite wet felted taking care to stop once in a while and reposition the flower so it’s not getting screwed up under the bubble wrap.
Step 3. Making the leaves and center piece
We’re going to repeat the same process for the leaves and center piece. Lay the design you want, use whisps of accent colours on the top of the base colour, wet it down with warm water and begin wet felting it using your fingers or a sander.
Step 4. Joining the pieces together
Anytime you want to join separate wet felted pieces together you need to add new whisps of wool roving. This acts as the glue that holds it together once you’ve felted it. Begin felting the pieces together just like you see in the video.
Step 5. Sewing on the beads
Your flower should be all complete now, apart from the optional beads you can sew on at the end. Sew on what you’d like and now you have a finished wet felted flower you can use as a hair piece, but it on a belt, use it as a brooch and the list is endless!
Your point of view caught my eye and was very interesting. Thanks. I have a question for you.
I don’t think the title of your article matches the content lol. Just kidding, mainly because I had some doubts after reading the article.